I. Changing the Shapes of Faces
- To get started, open Spark AR Studio and create a new project.
- Insert Face Mesh (From 3D objects)
- Go to the Inspector panel (right window) -> Click + Deformation -> Select download 3D object from sample https://origincache.facebook.com/developers/resources/?id=Tiny-Face.zip
- Picture as below:
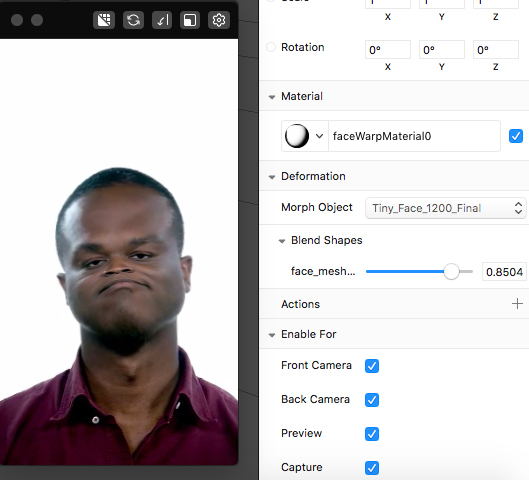
II. Adding Retouching
- To get started, open Spark AR Studio and create a new project.
- Insert Face Mesh (From 3D objects)
- From the face mesh is in the scene, go to the Inspector panel and click + next to Material
- Then, double-click the material you’ve created to inspect its properties.
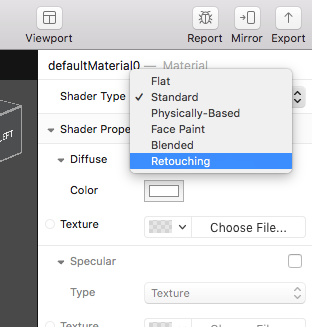
- Then from right window, select Shader Type, select Retouching
- Then update these parameters with values what you want:
- Skin Smoothing to 83%.
- Eye Whitening to 58%.
- Teeth Whitening to 28%.
- You can also select Fullscreen for this effect
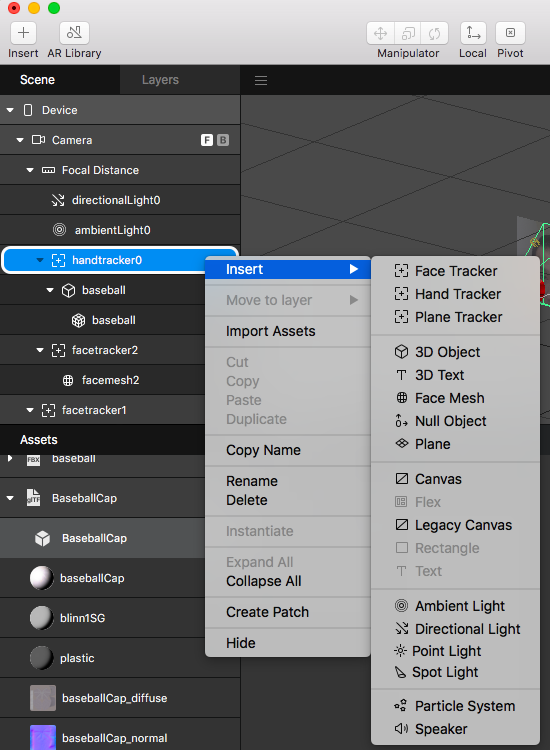
III. Adding a Hand Tracker
- Create project
- Insert -> Hand tracker
- Right click on Hand tracker -> Insert 3D object (By this way, it automatically maps object to the Hand tracker)
4. To scale object, click and see the right window property, customize our scale (x,y,z)
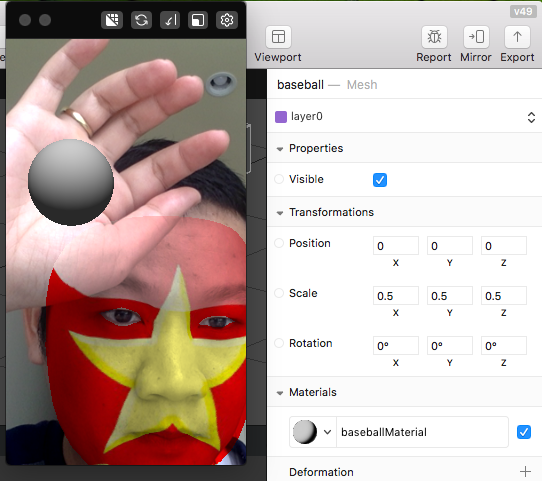
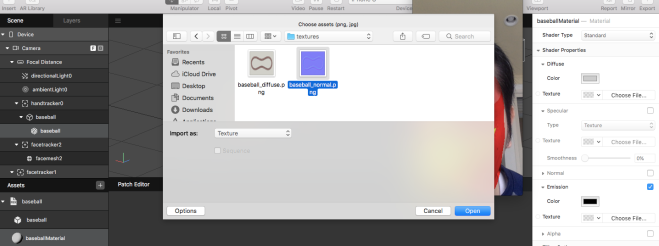
5. You can customize the skin for the ball: Right click on BaseBall -> in the right window, select Texture -> choose the file
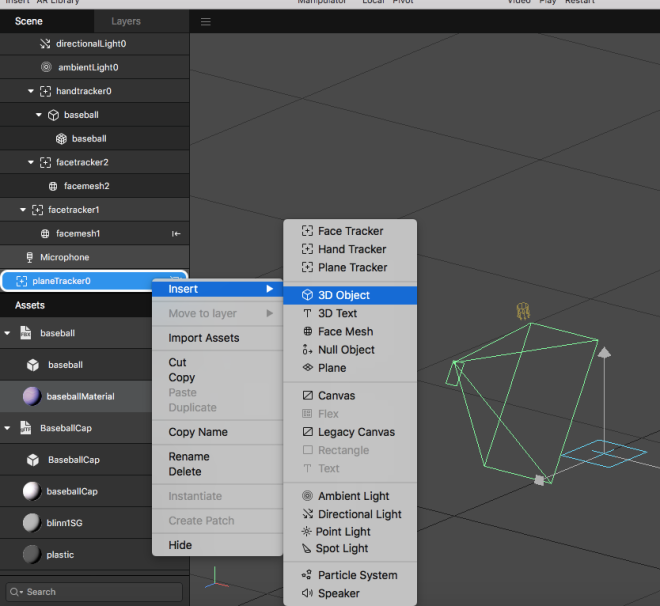
IV. Plane Tracker
- To insert a plane tracker:
- Click Insert.
- Select Plane Tracker.
- Click Insert.

- Any video you were using will no longer be visible because it change the point view of camera
- Create project
- Insert -> Hand tracker
- Right click on Hand tracker -> Insert 3D object (By this way, it automatically maps object to the Hand tracker)
V. Segmentation
- Select “Camera”, then view the Spector panel, click on + Segmentation.
- You will see the “Segmentation Mask Texture” in the Texture in left window.
- Insert a Rectangle ( It is a child of a Canvas automatically).
- Select Fill Parent in the Inspector panel (To full all the Scene)

- Insert -> Hand tracker
- Create New Material: Assess -> create new material
- In the Inspector window, tick Alpha option, and apply for “Segmentation Mask Texture” created at previous step.
- Selection option: Invert. Select color in Diffuse.

VI. Building Effects with 3D Objects https://developers.facebook.com/docs/ar-studio/tutorials/building-an-effect-with-3d-objects
VII. Adding Text to Effects

VIII. Using Particles
- Create new project
- Insert Particle

3. Edit material property
IX. Animating Objects with Skeletons
XI. Occluder
Adding an occluder can make a 3D scene more realistic, by hiding things that would be hidden in real life.
For example, in the image on the left there’s no occluder. The arm of the glasses is visible when it should be hidden by the head.
On the right, we’ve added an occluder:

Making an Occluder
Occluders are made of an object, with a material applied to it.
You can create and configure the occluder material in Spark AR Studio.
Occluder Objects
Any 3D object can be used as an occluder, once you’ve applied an occluder material to it.
If you’re occluding the face like in the example above, use a face mesh. This will cover the face and respond to its movements.
Occluder Materials
Once you’ve created a material, in the Inspector panel change:
- Shader Type to Flat. This shader is more performant than the Standard shader that most materials are set to by default. It doesn’t omit or respond to light, which is fine for the occluder material, as it won’t be visible.
- Opacity to 1%. The material will look transparent, but still hide objects behind it. Setting Opacity to 0% wouldn’t hide the objects behind it.
You might want to check the box for Double Sided. For example, so the back of the face mesh is also occluded if the user turns their head to the side:

XII. Visual programming
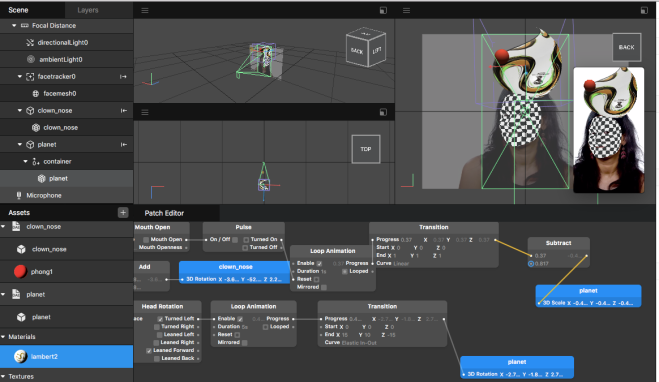
Moving scene objects with the face tracker
The simplest thing you can do is bind the movement of a scene object to a face tracker, so that the object moves with the face. To do this, insert a face tracker patch and then go to your object’s properties and click the dot next to Rotation. You should now see a face tracker and object patch in the Patch Editor.
Click the Rotation port on the face tracker patch and drag to the port on the object patch. Once the patches are connected, click Run to see it in action. Whenever your head moves, your object should move with it.

Using the face tracker to control animation
You can set an animation to begin and end when triggered by specific actions on a face. In the example below, the object is set to appear if someone opens their mouth. Then, if they lean their head to the right, the object changes position. If they close their mouth, the object disappears.
By connecting the Face Tracker, Head Rotation and Mouth Open patches via the Tracking Data ports, we’re telling Spark AR Studio that it should be using the information from the face tracker to look for an open mouth or a leaned head.

Using boolean signals to start animations
Both Mouth Open and Head Rotation are boolean signals, which means it can either be happening or not happening. Patches like Mouth Openness have scalar signals.
If you want to use a boolean signal to start an animation, you’ll need to use the Pulse patch to transform the signal into a discrete event.

Using logic
You can use logic to make your animation react to a specific set of conditions. For example, you can create a patch graph that makes a ball drop from top to bottom if the head is tilted in either direction. To do this, us the Or patch to indicate that the animation should occur if either or the other action happens.
Here, the Or patch is placed after Head Rotation so that it can take both the inputs from the face tracker and trigger the movement if the head is leaned left or right.

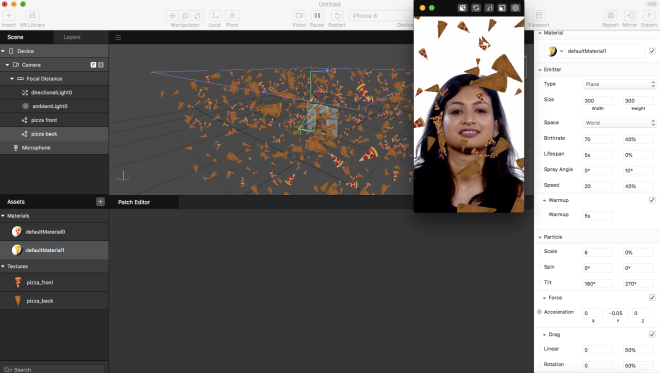
Recreating a tutorial
In the Basics of Scripting tutorial, we explain how to make pizza fly into your mouth when you open it. Use this example to create this effect with visual programming.

Using screen interactions
You can use interactions such as a tap to make your effect respond to specific actions on the screen. In this example, we’ve used the Object Tap patch to make an object change position when someone taps directly on it. You also use Screen Tap, Pan, Pinch or Rotate to trigger or control interactivity in your effect.

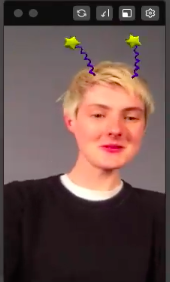
Using face gestures and counter
You can also use face gestures to control aspects of your effect. Here, we’ve used Smile to trigger different hats to appear, but you could also use Blink, Eyebrows Lowered, Eyebrows Raised, Right Eye Closed, Left Eye Closed or Smile to something similar. These patches must be connected to a Face Tracker patch to work properly.
We’ve also used Counter above to control when each hat appears. Counter allows you to track inputs, in this case smiles, and their count. We’ve set a maximum count to 3 here, which corresponds to three hat options we’ve added to the effect. Each hat is matched with a count number from 1 to 3, which triggers whether it’s visible in the scene or not.

Using screen interactions to control location
You can use screen interactions such as Screen Tap or Screen Long Press to not only control when things happen in your effect, but also to control how they happen. In this example, we’re using Screen Long Press to control where an object is located on the screen.
To do this, we used 2D Point Unpack to break the location of a screen press into it’s individual X and Y coordinates. We then use Multiply to change those coordinates by a set value. You could also use any math patch to make this change. In order to bring those coordinates back together, we use Point Pack. In this case, the object we are controlling the location of is 3D, so we used Point Pack instead of 2D Point Pack.

Using Runtime
The Runtime patch tracks the number of seconds that have passed since your effect started to run. One way you can use Runtime is to control how long something appears on the screen.
Here, Runtime connected with Offset tells the effect to check how long the effect has been running and compare against the offset we define. Here, we’ve used Less Than to define the offset as 3 seconds. This means that the text will only be visible when the runtime is less than 3 seconds.
For this example, we’ve also used Screen Tap to reset the timer, so that the text reappears when someone taps the screen. After 3 seconds, it will disappear again.

Using Facial Gesture Recognition Patches
In the example patch graph below, we’ve used all the facial gesture recognition patches in one effect. Each facial gesture triggers a different plane to become visible, creating an effect that can cycle through interactions that are tied to specific facial gestures.

